
Get rid of that lumbering and noisy mechanical drive in your home theater PC (HTPC) and use an iSCSI disk instead to store your live recordings in Windows media center. My HTPC uses a tiny (60GB) SSD disk for the OS and applications and a 1TB iSCSI disk to record gobs of live TV. I did this for two reasons, a mechanical disk is noisy and hot. There are some quiet disks out there but they still produce heat and take up space in the media center and I didn’t want to spend more money to get a quiet one when I had a perfectly good 1TB drive already. So I put it in my storage server and configured iSCSI. To put it simply, iSCSI is a method to access network storage as if it is physically attached. The iSCSI disk in my server looks like any other hard drive attached to my HTPC, except its in my server and accessed over my 1Gb network.
Couple caveats though. The storage you use in your server for this should be a dedicated physical disk. I found trying to use my RAID array which also stored all my media caused issues when I was transferring files back and forth. You need a 1Gb network. Hard wire your HTPC and use a 1Gbs switch in between the server and the HTPC and obviously both need 1Gbs NICs.
These instructions assume you have a Windows 2012 Server already running with a physical disk you can store the iSCSI disk on.
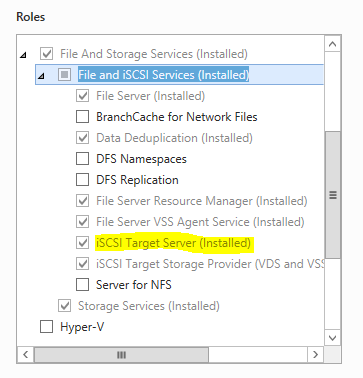
1. Install iSCSI Target Server. Open Server Manager and click on Manage –> Add Roles and Features. Expand File and Storage Services –> File and iSCSI Services –> Select iSCSI Target Server.
2. After it is installed you will need to add an iSCSI disk and targets. Under Server Manager click on File and Storage services –> iSCSI. Right click on the choose New iSCSI Virtual Disk.

3. Chose the physical volume where you are going to store the iSCSI disk. Remember it’s best to store this on a dedicated disk. Click next and give the disk a name. This is a friendly name so feel free to name it htpc or media center.
4. Click next and give the disk a size. You will only be able to allocate as much space as your disk allows. For example if you have a 2TB disk then you can add a 2TB iSCSI disk and consume all disk space. Or you can start with something small, it’s easy to expand later. 500GB is a good place to start. The calculation is 10GB/hour of HD video. So 500GB will allow you to store 50 hours of HD video.
5. After clicking next you will need to add a new iSCSI target. The target name is a friendly name, so again something like htpc.
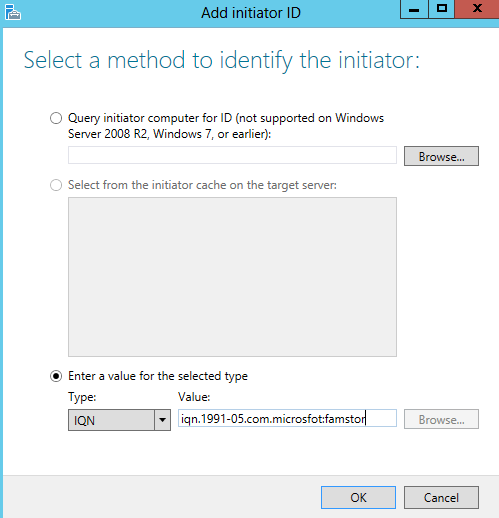
6. Access servers are the computers that will be connecting to the iSCSI server. Getting the IQN from the computer is the easiest way to add them. To do this go to the computer running media center that will connect. Open the iSCSI initiator, it’s under Control Panel –> Administrative Tools. When you first open it you will get a box asking if you would like to start the service, click yes.

7. Don’t bother with any of the settings in iSCSI initiator right now, we just needed to start the service. On the same computer open powershell and type “iscsicli” at the prompt without the “” then CTRL + C to exit. This will give you the IQN which is [iqn.1991-05.com.microsoft:computername] for example without the []. Below is what mine looks like.
![]()
8. Now that you have the iqn you can add it.
9. Click next and then next again to skip authentication. Since this is a HTPC on your local network authentication shouldn’t be an issue. Without authentication any computer on the network could connect to the disk, which in an enterprise would be a bad thing. But you’re at home not a data center.
10. Finally click create and you’re done.
11. Now it’s time to go back to the HTPC and add the disk via the iSCSI initiator. Again, open iSCSI initiator. Next to target type in the IP address of your server where you configured the iSCSI target disk and click Quick Connect. It should pop up with discovered targets and then click done.
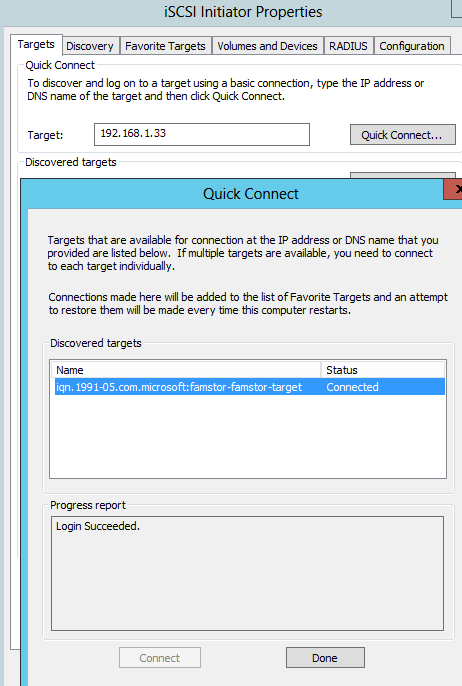
12. Click ok to close iSCSI initiator. The disk is now attached to the computer and you can format it like any other disk which you will need to do. Open computer management (Administrative Tools –> Computer Management). Navigate to Storage –> Disk Management. Right click on the new disk and click on online. Right click again and click on initialize and choose MBR for disks under 2TB and